
Do you miss the taste of fresh strawberries in the winter? Fresh strawberries can be hard to get in certain times and places, but with a hydroponic system, you can start growing hydroponic strawberries all year from your home.
Growing hydroponic strawberries even has advantages over growing strawberries in soil. You can grow faster, at any time of the year, and in any space, just to name a few.
Sound like a good project? Let’s get started.
What Do You Need to Grow Strawberries Hydroponically?
The exact supplies you need will vary based on what type of hydroponic system you’re using, as well as whether you’re buying it premade or going the DIY route, but these are some of the basic things you’ll need with any situation:
- A Hydroponic System – You’ll need all the equipment to set up the environment for your strawberries, which will vary based on what type of system you have. Scroll down for some thoughts on the best hydroponic systems for strawberries and where you can buy them or find the parts to build them.
- A Growing Medium – This is what fills the pot around your plants to keep them in place. You have a variety of different options for mediums, such as coco coir and clay pebbles.
We recommend Coco coir because it’s an inert medium, so it won’t affect the pH or other aspects of your hydroponic system. It’s also affordable and easy to find, so it’s a great option for beginners.
- Strawberry Plants – You can either grow your strawberries starting from seeds, or from young strawberry plants. Seeds can take a long time to bear fruit, so we’d recommend starting with young plants.
In this case, you’ll just need to rinse out the root system so you don’t contaminate your hydroponic system, plant the starts, and fill the rest of your net pots with your medium of choice.
- Nutrients – Since hydroponic plants can’t get nutrients from the soil around them, they take nutrients directly from the water they’re placed in. In order to get your plants what they need, you’ll need to buy hydroponic nutrients that you can put in your water.
There are multiple options for different kinds of nutrients, but for beginners, we recommend starting with something basic like the General Hydroponics Liquid Flora Trio.
- Water – In any type of hydroponic system you use, you’ll need to have some sort of water source for your plants. It’s also a good idea to have a water filter, especially if you’re using a hose or tap water to filter out harmful chemicals like chlorine and chloramine that are usually included in city water.
- A Light Source – Plants need light to photosynthesize, so you’ll need to design your system with a light source in mind. If you’re growing outside or near a window, you can use natural light. If this isn’t a reliable option, you can get artificial lights like LEDs or other grow lights.
Strawberries will need around 8-12 hours per day, so if you have artificial lights, you can keep them on that schedule for the duration of your strawberries’ life.
Of course, if you run into any issues with your plants or you’re looking to build a more complicated system, you may need some extras. You can add elements like temperature regulators or a grow tent to create the perfect environment for your plants.
If your plants are having trouble with their environment, you may also need to buy things like individual nutrients or a pH correcting kit to get everything back to normal. You can buy these as your needs arise, but this list covers the basics you’ll need for any system.
How to Grow Strawberries Hydroponically
If you’re a beginner you’ll be happy to see that this section isn’t too long and complicated. Once planted, strawberries don’t need a huge amount of involvement or maintenance to grow.
Set Up Your Hydroponic System
This is, of course, the first step to growing any hydroponic crop. This may be extremely easy or a bit more complex depending on which type of system you decide to use. We’ll go over some specific types of systems in a bit, but for now, we’ll focus on the general steps that most systems need.
Setting up your system can be as easy or as complicated as you make it. If you buy a premade system, you’ll probably just need to assemble the parts and get planting. If you decide to go the DIY route you have options as simple as cutting some holes in a bucket, or as complex as building your own tower system (more on that later!)
Once you finish putting the parts of your system together, you’ll need to place it by the light source, plug in any electronics, and fill your reservoir with water and nutrients.
Choose Your Strawberry Variety
When you go to buy your strawberries, you’ll likely have multiple varieties to choose from. You can always order seeds for a specific variety, but if you’re buying plants from the store (which is what we recommend) you may be limited by what’s available.
In general, day-neutral and everbearing strawberry varieties are best for hydroponics growers. Day-neutral berries are especially good if you’re growing indoors because the exact amount of light your berries get per day won’t affect them as much. These varieties will also produce berries year-round for multiple harvests.
Everbearing strawberry varieties are great because they allow you to take advantage of hydroponics systems’ ability to grow all year. These berries generally produce one crop in the spring and another one in the fall, but if your garden is really successful, they might even produce 3 crops in a year.
You may also want to look into the strawberry varieties available because they can take different amounts of time to start producing fruits. If you’re looking for some suggestions of specific varieties, Chandler, Douglas, and Red Gauntlet are a few good options.
Plant The Strawberries
If you’re looking to get berries right away, you should start with young plants. These are the kind of strawberry plants you’ll generally find planted in soil at the store. You can buy these plants and transplant them into your hydroponic system.
In this case, you’ll need to take the plants out of the soil they came in, and rinse out the root system. This is important to make sure you don’t contaminate your water with anything that’s in the soil.
After this, you’ll put the plants in your net pots, and fill the rest of the pot with the medium of your choice. Make sure you water your plants right away once you put them in the system so that they can start growing.
If you decide to start with seeds instead, you’ll plant the seeds directly into a medium. We’d suggest Rockwool plugs, which are easy to use. For these, just place the seed inside the plug, put the plug in your pot, and fill any additional space with your medium. Be careful, though—sometimes it can even take years for strawberry seeds to mature enough to bear fruit.
Adjust The Conditions Of Your System
After you plant your strawberries, you’ll need to double-check to make sure everything looks good. This is especially important in smaller hydroponic systems, because a little fluctuation in your nutrients, water level, or pH can seriously affect the whole system.
The main thing to check right away is the pH of your system. If you buy a system, it may come with a device, or you may need to buy it separately. For strawberries, the pH should be between 5.8 and 6.2. This is important because an imbalance in pH can make it harder for your plants to take in nutrients, and seriously affect their overall health.
In the first few weeks of growing your plant, you’ll also want to check your nutrient concentrations and water level frequently. In a small hydroponic system, it’s important to make sure all the levels are correct because one imbalance can really throw off your whole system. Checking regularly will allow you to ensure that everything is working correctly, and fix any issues if it’s not.
It’s also important to monitor the temperature of your system. Strawberries thrive most in warmer temperatures, around 65-80 degrees Fahrenheit, so try to keep them in an environment that is around this temperature. If need be, you can always purchase extra equipment to regulate the temperature in your space.
If you start to notice any issues in your plants, such as leaves drying up this is also a sign to check the nutrients and other conditions of your system. You can look up the specific symptoms your plant is experiencing to find out potential causes of any issues you see.
Pollinate Your Strawberries
In the natural world, strawberries are able to reproduce through the efforts of pollinators like bees. If you’re growing indoors, however, you’ll need to do this work yourself.
To hand-pollinate your plants, all you need is a small q-tip or paintbrush. Gently rub each flower with the brush or tip to transfer pollen from one flower to another. Some farmers growing larger systems will actually use bees to make pollination more efficient, but if you’re an individual grower, the DIY option will work just as well.
Maintain Your Plants
Luckily, hydroponic strawberries don’t require a lot of maintenance. Some growers like to prune off extra leaves and runners from their plants. This isn’t absolutely necessary, but it can be helpful in order to let the plant spend more energy on growing fruit rather than leaves.
You can also clip back the flowers of your strawberries for the first 4-6 weeks. This is also not a necessity, but once that period is over, it will allow your strawberries to produce more fruit at a time, so the end result is worth it.
The most important part of monitoring your strawberries will probably be to keep an eye on them and make sure that their environment is balanced, and the plants don’t have any issues. Strawberries can be susceptible to some diseases like Mucor fruit rot or Powdery mildew, so you’ll need to check your plants to catch and treat these early if they do arise.
As you maintain your hydroponic garden over time, you’ll get a better idea of what it needs, and how to keep it happy. Remember, each plant and each environment is unique, so it’s ok if your garden doesn’t conform exactly to what you’ve read online.
Harvest Your Strawberries
The moment you’ve been waiting for! If you don’t choose to clip the flowers back, strawberries will often be ready around 4 weeks after the plant starts to flower. You can tell if your strawberries are ready by the color and texture. The strawberries should be red all around and have only a slightly firm consistency.
Strawberries don’t need any fancy harvesting procedures. Once they’re ready, you can just pick them off the plant and enjoy!
Best Hydroponic System for Strawberries
When you’re growing hydroponic strawberries, you have a couple of different options for possible systems. You can choose your system based on the space and resources you have, and what seems easiest for you.
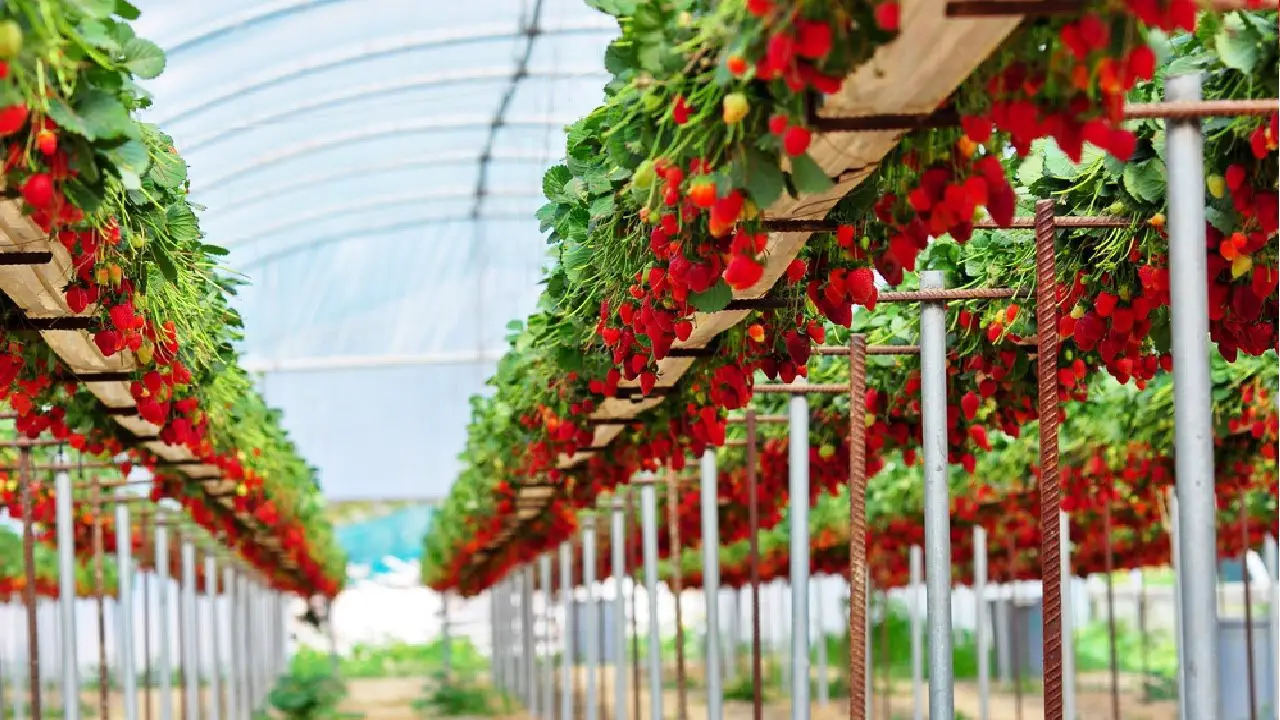
Hydroponic Towers
These are premade vertical systems where you can grow your strawberries or other hydroponic plants. They are often a good option if you have limited space because the vertical configuration allows you to fit more plants in a small area.
You can buy hydroponic towers from a variety of hydroponics companies, such as Lettuce Grow. These premade systems can be on the pricier side, but they are incredibly easy to use, with most of the setup done for you, and tools and instructions for all the maintenance you need.
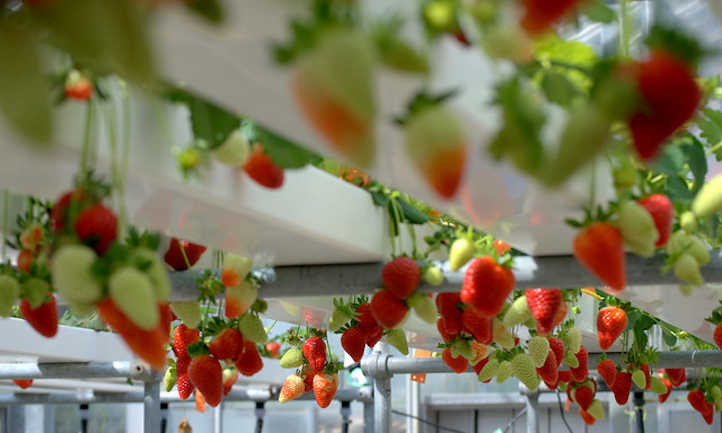
Hydroponic towers are vertical, pipe-like structures with pockets for plants to sit along the sides. The nutrient solution is stored in a reservoir at the bottom, and an electric water pump moves the water up to the top so that it can flow down over all the plants. The excess water then flows back down into the reservoir to be recycled.
Premade towers often come with tools like starter packs of nutrients to help you get started. This is a great option if you’re nervous about learning everything yourself, and the time and effort it saves can be worth the money.
These towers come in varying sizes, so you can choose based on how large of a garden you’d like to grow. Most towers are also adjustable, with levels that can be stacked on top of each other as you add plants to your garden. Some can hold up to 36 plants, so they’re a great option if you’re looking to start small and expand later.
If you have a tighter budget or you’re looking to go the DIY route, you can also build your own hydroponic tower. This will involve some tools and extra work, but it is still relatively simple and can be a great option to start your hydroponic garden at a lower cost.
Ebb And Flow
This is one of the most basic types of hydroponic systems and can be used for a variety of plants. You can also buy premade ebb and flow systems, but in general, these will be easier to set up on your own. They are relatively simple, efficient, and beginner-friendly.
In an ebb and flow system, the plants sit inside a grow tray. The grow tray is placed above a water reservoir, and an electric pump brings nutrient solution up from the reservoir and into the grow tray.
The electric pump runs on a timer to control the schedule of pumping and make sure plants get enough nutrients each day. Excess water will then drain out of the grow tray through a drain pipe.
Ebb and flow systems are popular for hydroponics beginners because they are relatively easy to set up, requiring a minimal amount of parts and DIY work. These systems will take up more space than your standard hydroponic tower but can be easier to set up and maintain if you’re not buying a premade system.
Nutrient Film Technique (NFT)
The Nutrient Film Technique is another one of the most popular systems for growing hydroponics. This system also runs using a water pump and reservoir and operates on a similar principle to the ebb and flow method.
In a nutrient film system, a grow tray is placed above a reservoir with a nutrient solution. A water pump brings the solution up from the reservoir and into the grow tray. The grow tray is placed on a downward sloping angle, with the drainpipe at the end. The nutrient solution will continuously flow over the plants’ roots, creating the nutrient film that gives this technique its name.
This type of system has the advantage of constantly recirculating the nutrient solution. This helps keep the nutrients fresh and prevents any nutrients from coming out of the solution and becoming stuck at the bottom of the reservoir.
As with the other types of systems mentioned, you can either buy a premade nutrient film system or build one yourself. This type of system is also pretty simple to set up and beginner-friendly, so it may be another good option to think about if you’re on a lower budget.
How To Make A DIY Hydroponic Strawberry Tower
Although a premade hydroponic strawberry tower can be a very easy option, these systems often cost over $500. This can be worth it to eliminate the hassle of doing everything yourself and to make sure the system is assembled properly, but if that number looks like too much for you, there is another option.
You can build your own hydroponic strawberry tower with ingredients from the hardware and hydroponics store. This will probably cost somewhere closer to $100, so it’s a much better option if you’re trying to start out on a budget.
There are a variety of different ways you can build your own hydroponic strawberry tower, but we’ll go over the simplest one, which is just made using a PVC pipe and some tools.
Step 1: Cut Slots In Your Pipe
This is how you’ll create the pockets for your plants to grow in. The number of slots you can put in your pipe will depend on how tall you choose to make it, but in general, you should cut slots at 8-inch intervals. You’ll also need to alternate the sides of the pipe you cut on to make space for your grow cups.
Step 2: Mold The Pipe
This step will allow you to mold a simple PVC pipe into the right shape for a hydroponic tower. You’ll need to create an opening that is small enough that your grow medium doesn’t fall down, but large enough that water can flow down the sides of the pipe to reach each plant.
In order to do this, you’ll need to heat the pipe until the plastic is flexible, and then push the plastic back to create this small opening. Make sure to heat your pipe in a well-ventilated area, as PVC can release harmful chemicals into the air.
Step 3: Attach It To Your Pump And Reservoir
If you’re looking to keep it super simple, you can just attach one or a few towers to a water reservoir like a bucket or container, and install the water pump to bring the nutrient solution up to the top so that it can go down through the plants.
To build a more expansive system with a number of pipes, you’ll have to connect them together to bring the water down into the reservoir. You can connect multiple towers horizontally to each other, and to your reservoir.
One advantage of a DIY strawberry tower is that you’ll be able to expand it as much as you like to add to your garden as you explore the world of hydroponics more.
Step 4: Fill Your Tower And Plant
This last step will be the same no matter what kind of tower you buy or build. You’ll need net pots or grow cups to plant your strawberries in, and you’ll place these in the pockets in your system. Then put your plants in their grow medium, and follow the steps described in the previous section to grow your very own strawberries.
Hydroponic Formula For Strawberries
When it comes to growing strawberries, you’ll need to make sure your plants get enough nutrients. This is crucial to plant growth, and the correct concentration is especially important in a small system.
For strawberries, you’ll need to focus on giving them enough nitrogen, potassium, and phosphorus. These are the most important primary nutrients, but you’ll also need an ample amount of secondary nutrients and micronutrients.
Especially if you’re a beginner, it’s a good idea to use liquid nutrients. Organic nutrients can often clog and complicate your hydroponic system, so if you’re a beginner, it’s probably best to start with synthetics.
The General Hydroponics Flora Trio is always a good bet for beginner hydroponics growers. This is a basic nutrient formula that can be used for most plants, including strawberries. You can also try alternatives like the Dyna-Gro Combo Pack, or the FoxFarm Nutrient Trio. Your nutrient solution will come with instructions on how to use it.
If you start to have issues with your plants, you may have an issue with your nutrient concentrations. If this happens, it’s a good idea to look into what nutrient imbalances you might be seeing based on the symptoms your plants are showing, and what materials you can buy to correct them.
Hydroponic Strawberry Yield Per Plant
This may be different based on what type of strawberries you’re growing, the age of the plant, the environment it’s in, and a variety of other factors. As a general rule, you’ll likely get 150-400 grams of strawberries from each plant. If this is less than you’re expecting, the good news is that unlike plants in soil, you can grow hydroponic strawberries year-round.
Growing strawberries hydroponically is a great way to get your own fresh fruit without the resources and space that it takes to grow strawberries in soil. With hydroponic methods, you’ll also enjoy advantages like year-round yields, faster growth, and lack of needing to water your plants with a relatively easy setup.
Before you start growing your strawberries, think about your options. You can use a variety of systems, from premade hydroponic towers to DIY systems, so it’s good to think about what your budget is, how into DIY you are, and how much time and resources you’re willing to commit to this project.
Once you get your strawberries started, you’ll find that hydroponics growing is a great hobby that’s easy to start, and offers many opportunities for learning and growth as you go on. And best of all, you’ll get your very own strawberries as a reward for your hard work!
Recap
As you can see, even if you’re a beginner strawberries are a great plant to grow hydroponically! So get started today and watch your strawberry plants grow and grow! If you liked this article make sure you check out the rest of the website! Otherwise have a great day!