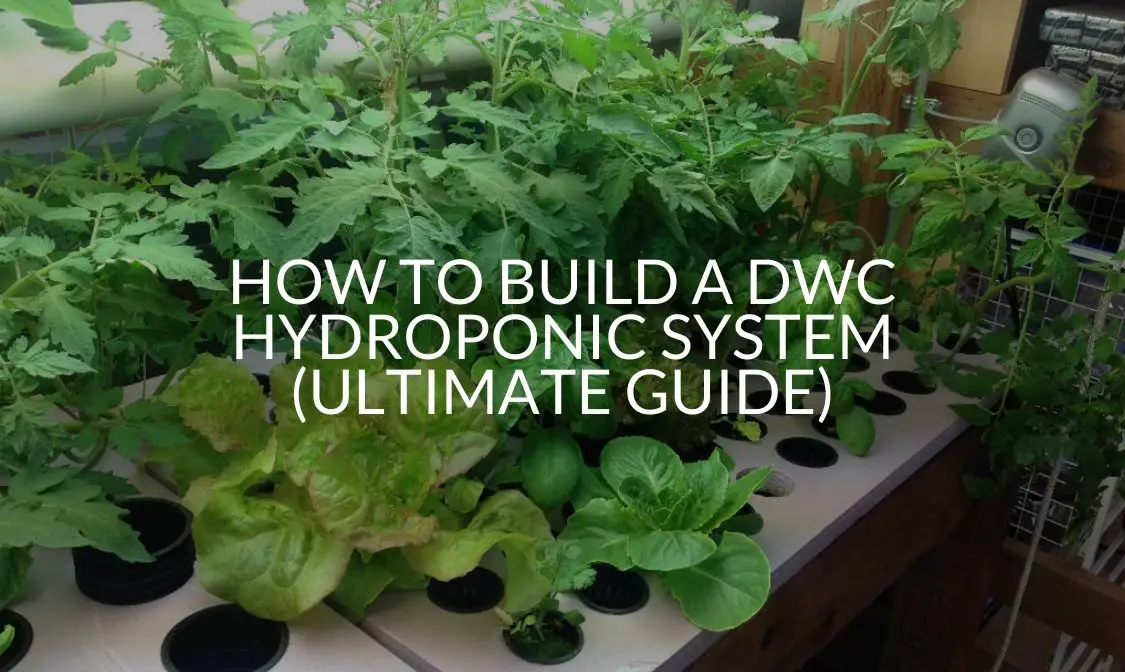
For city dwellers with limited or no space to grow plants, hydroponics can be the perfect option to get some green in your life. With just a little space in your home and some easily obtainable materials, you can grow your DWC system from start to finish.
There are a variety of different methods for growing hydroponic plants, but Deep Water Culture (DWC) systems have a variety of advantages. These systems offer you a little more leeway in terms of watering them—since the roots always sit in the nutrient solution you can leave your plants for days at a time.
DWC is also good for beginners because it is easier to set up than many traditional hydroponic systems. This guide will take you through how to do it, and what options you have for your own plant habitat.
What Are You Going To Need?
As you’ll see throughout this guide, there are a variety of different options for how you can set up your DWC system. Some of them will require a little more DIY setup, while others are simpler for beginners.
For a basic DWC system, you’ll need:
- Storage tote – You have a variety of options for these in terms of size and type. You can use totes or buckets, which you can buy from a hydroponics or hardware store, and the size will depend on your growing space and what plants you want to grow.
- Drill – You’ll need this to make the holes in your container for your plants and air circulation system.
- Net pots – This is where you’ll plant your seeds to make sure that the roots can grow out into the nutrient solution in your reservoir.
- Air pump – You’ll also need an electricity source for this, as it should be running all the time to keep your solution properly oxygenated.
- Air stone – Helps your air pump do its job of providing oxygen to your plants. The air pump and stone system is the same one you see used in fish tanks.
- Nutrient solution – Nutrient-rich water is the defining characteristic of a DWC hydroponic system. This solution allows your plants to take in nutrients directly without the intermediate step of going through the soil, allowing faster growth and greater yield than plants grown in soil.
- Water – You can use any type of water, as long as you make sure to filter it. Especially if it is city tap water, it will likely have chlorine and other chemicals in it, so you’ll want to make sure to remove those so they don’t harm your plants.
- Seeds – The part you’ve all been waiting for! You can grow a variety of different types of plants in a DWC, including vegetables, herbs, and cannabis.
How to Build Your DWC Growing System from Start to Finish?
Building your DWC system can be as easy or as complex as you decide to make it. A basic DWC system can be built very quickly with a container, net pots, plants, light, and an air filtration system. It’s a great way for beginners to get started with hydroponics especially since you can build it with as many or as few plants as you’d like.
For growers looking to improve their systems, there are a variety of options available, including extra parts you can buy to increase your system’s efficiency. You can even build parts of it from scratch to create exactly the environment you’d like to see and expand your system to encompass as many plants as you’d like.
In this guide, we’ll give you the basic version with some ideas of how you can level up your indoor garden.
Step 1: Create Your Water Reservoir
Choose Your Container
You’ll use your plastic storage tote(s) as your water reservoir. The size and number you get will depend on how large your garden is. The most important thing to keep in mind with your tote is to make sure that the sides are sturdy so that they can hold the weight of your plants and water.
It’s generally a good idea to get a black plastic tote with a yellow lid. The black sides will prevent light leaks, and the yellow lid will help to keep the temperature of the water down. If you can’t find a yellow lid, you can also paint your lid white.
A standard 7-gallon storage tote is a good size to start with. You can also use buckets instead of tote boxes if you’re growing a single plant, or this configuration fits your space better. If you’re building a larger and more complex system, 8-10 gallons of water per 100 watts of LED light is generally a good metric to go with.
If you’re concerned about regulating your water temperatures (it’s essential to keep your DWC system cool), you can always get larger totes. There’s no such thing as too much water, and the more you have, the more the water will regulate its own temperature. This has the added advantage of allowing you to leave your plants alone for longer periods of time.
The type of container you use for your reservoir isn’t set in stone either. Some people use buckets as small as 5 gallons from the hardware store. This can be a great option if you don’t have as much space and if you’re looking to grow fewer plants.
Growing Space Options
If you’re a more experienced grower or planning to grow more plants, you may want to get a grow tent. You can buy these relatively cheaply in a variety of different sizes and they will help to maximize your space and the efficiency of your plants so that you can have the greatest possible yield.
If you’re really looking to create the perfect growing space for your plants, you can even build your own growing box. This will require some plywood and some extra steps, but it can be a great way to give your plants a bit more sturdy structure and their own special environment.
Even if you’re not building anything complex, it’s important to choose a growing space where you’ll be able to give your plants enough light, and where they won’t be disturbed. It’s a good idea to make sure you have your growing space secured before you finish setting up your system since it can get very heavy once there’s water inside.
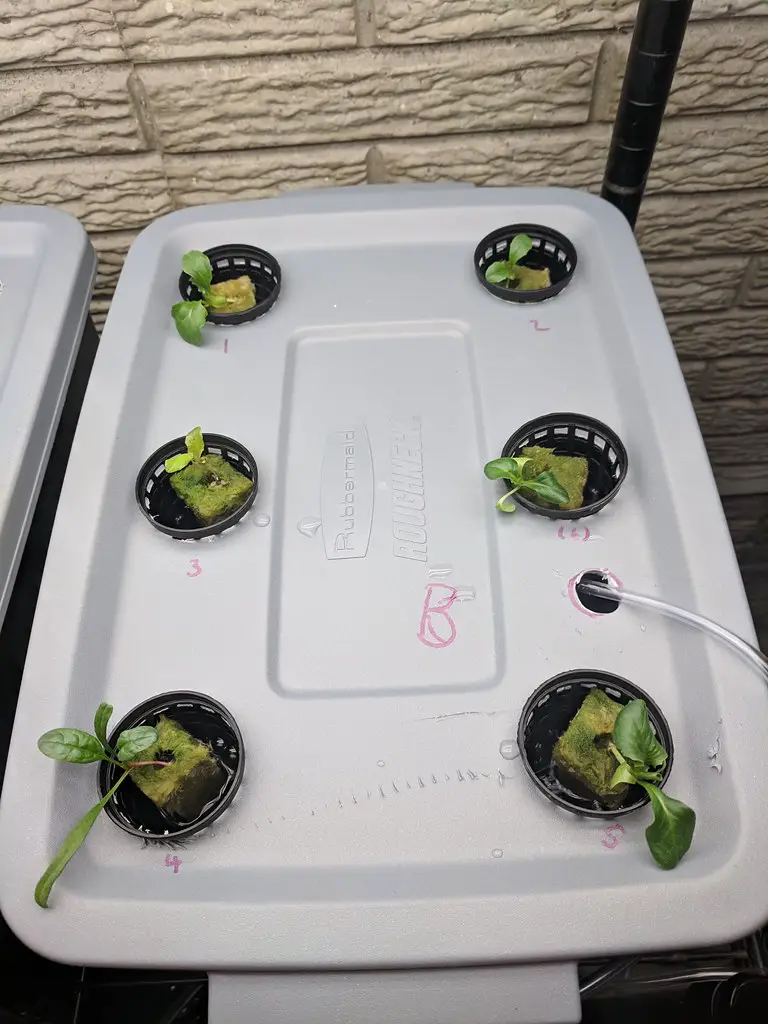
Make Holes for Your Plants
The next step is to drill or cut holes in your container lid so that you can put your net pots inside. If you go the basic route, this is the only bit of major DIY work that you’ll need to do. It can be helpful to put some wood under your lid when you do this step to make sure that you don’t break the plastic.
You can decide the number and size of holes you make in your system based on what type of container you’re using and how large it is. For instance, if you’re using a bucket you may just want to drill one hole. It’s important to keep the holes far enough apart to avoid crowding the plants and having them interfere with each others’ growth.
The holes should be just big enough to fit the net pots in (so they don’t fall in!). You can measure the right size by setting the pots on the lid of the totes and marking the edges. If you do this, cut smaller than what you’ve drawn to make sure that your pots don’t fall in.
Step 2: Create An Airflow System
Make An Air Hole
This system will provide the necessary oxygen to your plant’s roots that will allow them to survive. After you cut holes for your net pots, you’ll want to drill one more hole on the edge of your tote lid that you can run your air hose through.
Cut Your Air Hose
Next, take your air hose and cut it so that it will go from the middle of your reservoir to your pump.
Connect the Air Hose To The Air Stone And Air Pump
The air hose will connect your air pump to your air stone, creating an overall system that gives your plants enough oxygen by blowing air bubbles into the water. The air stone is submerged in the water and helps to keep the water oxygenated by creating more bubbles.
You can also place a check valve in the middle of your air pump and air stone. This will often come with the air pump when you buy it and it helps make sure that no water comes into the air pump when it’s not on.
In general, though, it’s not a good idea to turn your air pump off, because you may run the risk of not having enough oxygen in your system.
If you do decide to install a check valve, you’ll need to attach one end of your air hose to the check valve, then cut another short length of air hose to attach the valve and the pump.
It’s a good idea to make sure that your air pump and stone are placed at a level higher than the water level in your system to make sure that water doesn’t get siphoned out of your system and into the pump (especially if you don’t have a check valve!).
Step 3: Choose Your Light Source
Photosynthesis is the most essential element of plant growth, so it’s important to make sure that you have the light source for your hydroponic system set up. If you’re creating a really simple system, you can put it near sunlight or an artificial light source.
If you’re using sunlight for your system, make sure you place it outside in direct sunlight, or by a window that gets a lot of sunlight. If you’re doing this, make sure to be careful about regulating the temperature of your DWC system, as too high of a temperature can put your plants in danger of root rot.
While sunlight may be the most natural light source, it’s may not be the most reliable one for an indoor garden, so it’s good to get some LED lights. You can buy an LED lamp, or get LED lights that will attach to the surface above where your plants are growing.
The best quality option for LED lights will be Full Spectrum LED Lights. These have a great value for their price, can be installed wherever you are growing your plants, and are ideal for DWC systems because they have a lower heat output than other light sources.
Step 4: Set Up Your System
Add Water
Now that you’ve created all the parts to your DWC system, you can set it up! First, you’ll want to fill your reservoir with water, enough to cover the bottom of your plants’ roots. It’s important to make sure the roots are in the solution, but that the entire plant is not submerged.
In terms of the type of water that you use, it’s important to make sure that it’s filtered water. You can use a water filter to remove the chlorine, chloramine, and any other harmful chemicals from water to make it safe and healthy for your plants.
As the plants grow, the roots will grow out of the net pots and into the water. At this point, you can reduce the level of nutrient solution that you use, but in the beginning, it’s important to make sure the bottoms of your pots are covered.
When you’re filling it, make sure you keep track of how many gallons you use, because you’ll need this to know how much nutrient solution to add.
You’ll need to refill your water periodically as you maintain your hydroponic system. It’s also a good idea to top up your water with more of your nutrient solution to make sure that your plants are getting everything they need.
Add Nutrients
You can use a general nutrient solution for hydroponics. The General Hydroponics Flora trio is always a good place to start. You can calculate how much you need based on the amount of water you use, and what specific nutrient solutions you’re using. The instructions on the nutrients you buy should tell you how much to use.
When you measure your nutrients, it’s always good to estimate on the more conservative side. You can always have extra water, but you don’t want to run the risk of burning out your plants by overfeeding them.
You can create your nutrient solution by mixing up dry nutrients with water in a small container. Always make sure to use water when you’re mixing up dry nutrients so that they’re able to mix properly.
Once you add the nutrients to your system, you’ll need to make sure to adjust the pH of the water. The pH should be anywhere from 6.5-7.5, but it’s a good idea to check what pH is best for the specific plants you’re growing.
You can bring the pH of your solution down using phosphoric acid, which is generally sold as ‘pH Down’ for hydroponic systems.
You can add a recirculation filter as an extra to your system. This will help keep the nutrients circulating and make sure no nutrients fall out or get stuck in the bottom of the system.
Add Plants
The final step in creating your DWC hydroponic systems is to add your plants. You can use either bare-root plants or seedlings with rapid rooter plugs or rockwool plugs. Plugs will probably be the easiest option, as you can just put your seeds in and place them in your hydroponic system.
With rapid rooter plugs, you’ll just buy the plugs, place your seeds in the hole of the plug, and add water. This is probably the easiest way to plant your seeds and doesn’t leave much room for potential errors.
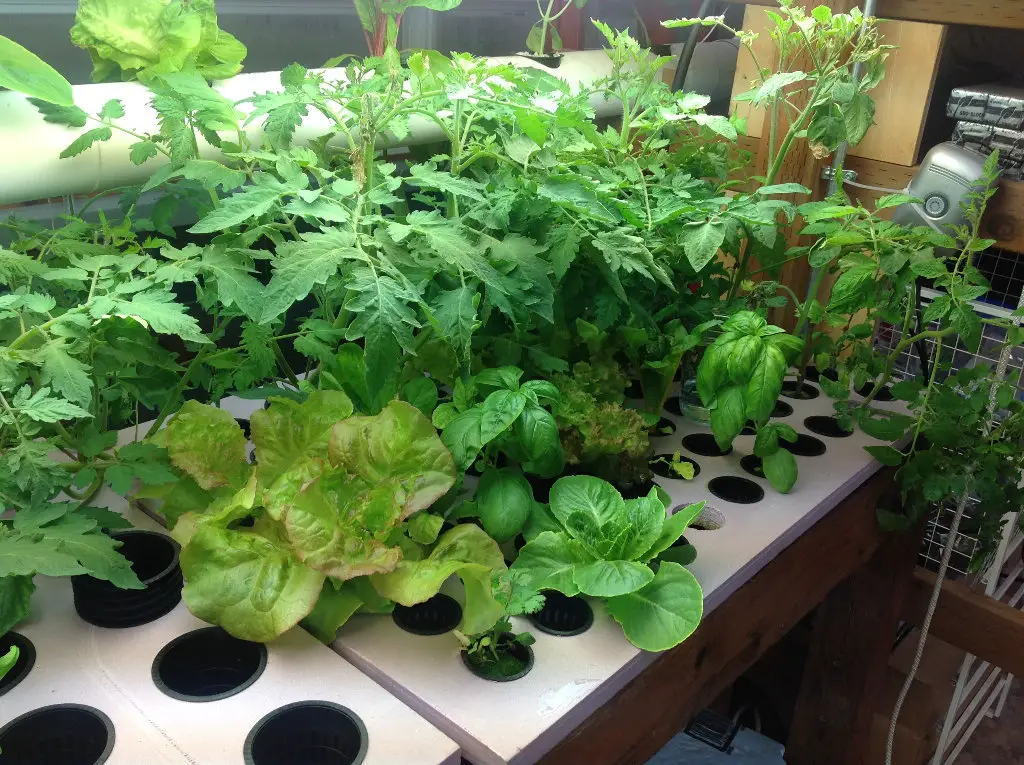
Most plants can grow well in DWC systems. These systems are especially popular for growing vegetables and herbs, as well as cannabis. These plants generally get a better yield in DWC systems than in soil because the roots are placed directly in the nutrient solution.
You can grow as many plants as can fit in your reservoir containers, but having too many plants in one can crowd the system and potentially disturb your plants’ roots as they grow. It’s generally good to have three plants or less per container, although the most efficient way is probably to give each plant its own containers.
Step 5: Maintaining Your System
One of the great things about DWC systems is that they don’t take a huge amount of work to maintain. They do take some, though, and it’s important to maintain your system to keep your plants growing.
Refill Your Water
It’s essential that the water level of your system doesn’t drop below the roots of your plants. This is especially important in the early phases of development when the roots don’t extend much outside of the pot.
One way that you can make sure you maintain the water level in your system is to buy a water level indicator. This will help you gauge when you need to refill, although it is important to remember that the key thing is not the overall water level, but whether the water is touching the plants’ roots.
You’ll also need to clean your reservoir and replace your water periodically. Depending on which plants you’re using, you may need to do this anywhere from every 21 days to every week. It’s probably a good idea to refill more often in the beginning and to do research on the specific types of plants you’re growing and what they need.
Keep The Nutrients Filled
This is a key thing whenever you refill the water. Even when you’re just topping the water off, it’s important to make sure you’re mixing nutrient solution, to make sure the plants have everything they need to grow.
If things start to go wrong with your plants, you may need to adjust the nutrient balances as well. Each plant is a living organism, and each environment is different, so the standard nutrient solution may not give your plants everything you need. If you do notice negative changes such as yellowing leaves, don’t panic, just do some research and adapt your system.
Check The pH
This is another key thing that can cause problems in your hydroponic system. To avoid these issues, make sure you check the pH every time you top up the water, just to make sure it’s at a good level for your plants, and adjust it if anything seems off.
This is extremely important, especially if you’re using natural light, or a light source that may not be as reliable. Your plants need enough light in order to grow successfully, and if you start noticing problems, this may be another reason.
Keep The Temperature Down
The temperature of a DWC system is also essential. Factors like light, temperature, and pH can affect your plants’ overall growth, as well as their ability to take in nutrients. If you start noticing problems with your plants, this may also be the cause.
Always Be Ready To Adapt
If you’re having trouble keeping the temperature down, you can add fans or other temperature controllers to your system to regulate the temperature. This may get a bit more on the advanced side, adding more technology to your space, so if you’re a beginner try to keep your plants in a cool environment.
If you start noticing any issues with your plants, the first step is to diagnose and figure out what’s wrong. You can do research online based on the symptoms you’re seeing, or contact the hydroponics store you bought from to get some help.
FAQ
How Deep Does A DWC Need To Be?
This will depend on the size of a plant. For some plants like lettuce, you can grow them in as low as 4 inches of water. For larger plants, it’s generally a good idea to have at least 8 inches of water to make sure their roots have space to grow.
How Often Should You Change The Water In A DWC?
This will depend on the plant, and what stage of growth it’s in. You should change your water reservoir completely at least once every two, but often plants may require you to change it every week. You may also want to top off your reservoir with nutrient-rich water with a less strong solution to keep your plants healthy.
Do You Need A Reservoir For A DWC?
Yes! The reservoir is the defining factor in building a DWC, and it’s the first essential step in the process. Having your plants grow in a reservoir of water has a variety of advantages including making them lower maintenance so that you can even leave them for days at a time.
How Much Water Should You Put Into A 5-Gallon DWC?
The general rule for DWC systems is that the bottom of your net pots should be around ¾-1 inch underwater. This may be different based on the size of pots you are using. In general, this comes to about 3 gallons of water per 5-gallon container, but it’s a good idea to check and make sure this gives you the correct water level.
What Temperature Should A DWC Be?
A DWC is ideal for lower temperatures since higher temperatures increase the risk of rotting in the roots. The maximum possible temperature in a DWC is 72F but the ideal range is between 65-68F. You can keep your water temperatures down through methods like painting the container white, increasing ventilation, adding insulations, and using a greater amount of water.
Is Tap Water Okay For A DWC?
Yes, if it’s treated properly beforehand. Tap water can contain harmful chemicals like chlorine, chloramine, and others. You can eliminate these and make your water safe for your plants by leaving it in the sun and using a filter.
Recap
Whether you’re a beginner or a seasoned hydroponics grower, a DWC system can be a great option for your indoor garden. The systems are relatively easy to set up, with a minimum of complex procedures and parts. They’re also easy to keep up, and are some of the more forgiving types of hydroponic systems.
If you’re a more experienced grower and looking to give yourself a challenge or customize your system more, you can look into options like growing larger numbers of plants, growing in a growing tent, or even building your own growing box. While these aren’t absolutely necessary, they can help your plant health and overall yield.
Now that you have all you need to get started on your DWC system, it’s time to put it into practice. Grab your plastic tote, your supplies, and your plants, and get started!
Sources
- https://growdoctorguides.com/dwc/
- https://sustaineveryone.com/2019/08/09/construct-a-dwc-hydroponic-garden-in-less-than-an-hour/
- https://www.nosoilsolutions.com/how-to-build-a-simple-dwc-hydroponic-system/
- https://gardeningheavn.com/dwc-hydroponics/
- https://www.growweedeasy.com/deep-water-culture-faqs
- https://www.squaremilefarms.com/post/how-to-build-your-own-hydroponic-system-a-beginners-guide