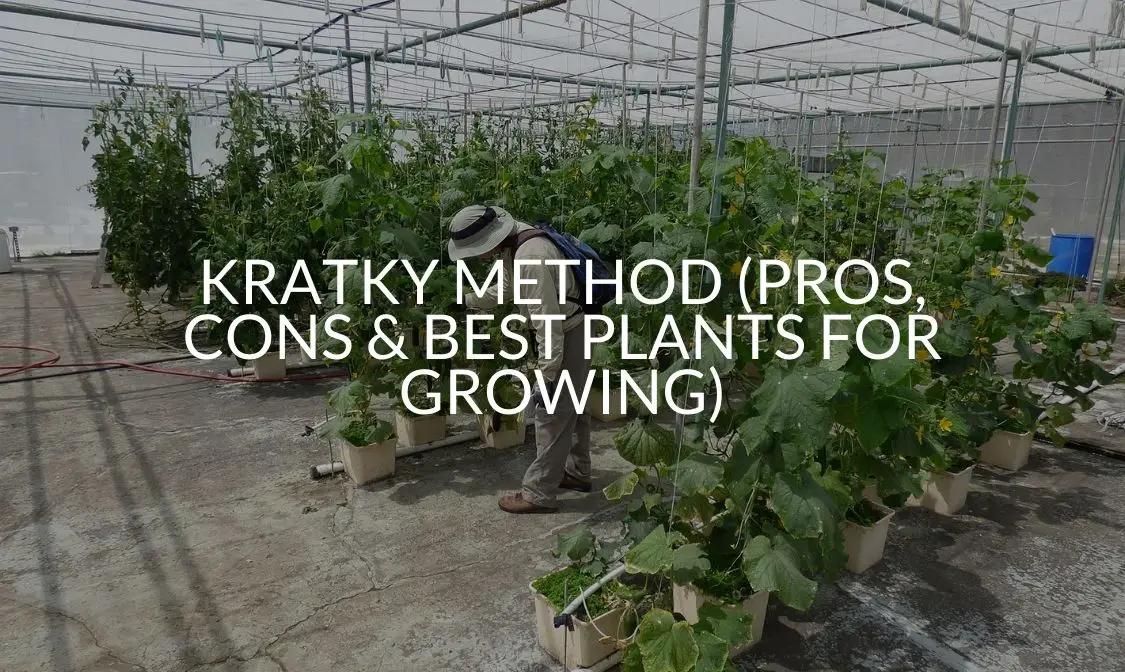
For anyone interested in gardening, the Kratky Method is a perfect way to jump in due to its simplicity and low-cost design. Guiding you to create a passive hydroponics system, there are a lot of benefits from being educational to not taking much time to implement.
However, there are a number of Kratky Method pros and cons to be aware of because nothing is perfect. While it’s for a wide range of people, it has problems like protection or becoming tedious on a larger scale. Still, it’s worth knowing about to decide for yourself so let’s get started.
What is Kratky Hydroponics?
B.A. Kratky came up with his hydroponics method in the 1990s and wrote a paper on it in 2004. Titled, “A Suspended Pot, Non-Circulating Hydroponic Method,” Kratky invented a way to raise plants without the need for an air pump or any form of electricity.
By taking expensive equipment out of the equation and lowering the difficulty, Kratky hydroponics opened gardening up to a new wave of homemade green thumbs. It doesn’t take much to get started beyond some household supplies, so how does it work?
How Does the Kratky Method Work?
Every hydroponic growth method follows the same basic principles of planting a seed, waiting for it to sprout, and transferring the plant into a cup with fertilized water to finish growing. The main difference is that the Kratky Method has a new way of providing air for the roots.
With the Deep Water Culture method, you have to monitor water levels and constantly rejuvenate the oxygen in the water to avoid your plants suffocating. That’s because the plant roots remain underwater at all times, but the Kratky Method has a different approach:
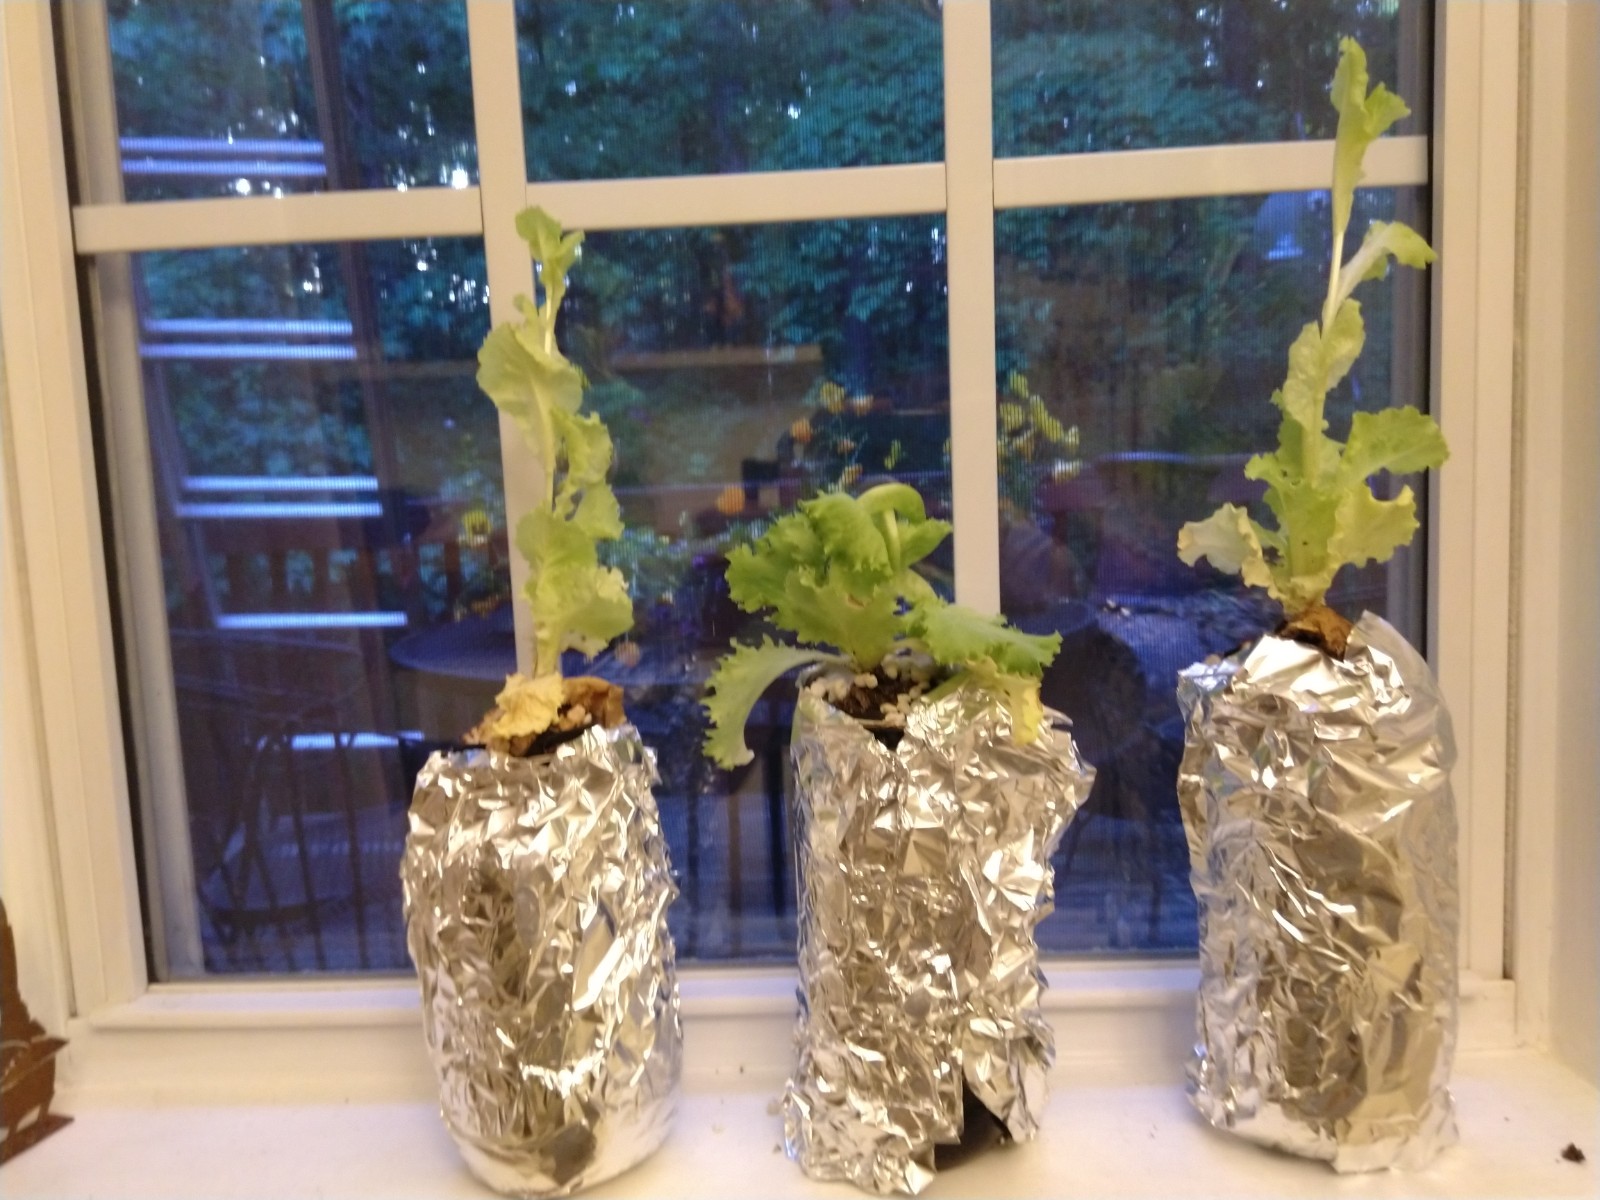
- The first step is to find a container. Most people go with something between 1- and 5-gallons because you need space for your plants to grow. Depending on the container and the plant you choose to grow, you might be able to fit more than one per container but for some you’ll only get a one-to-one ratio.
- Cut a hole in the top of your container’s lid that you’ll hang a mesh net in. You can use whatever you need to cut the hole, but cut based on the size of your intended net pot.
- Now comes possibly the most important step: Adding the hydroponic solution. You want to add enough that it just touches the bottom of the net, so if you go with a 3-inch net you need to fill your container 3 inches from the top.
- As a side note, you need to use clean water for the solution. Regular tap water usually has chemicals or sedimentation that can ruin your plants, so go with distilled or filtered water from the store. Then just follow the instructions for adding hydroponic nutrients.
- Using a pH testing kit, make sure you check the pH balance of your solution. Ideally, you want to aim for a pH between 5.5 and 6.5. If you don’t know how the kit works, you dip a pH strip into the solution and the color will indicate the pH levels.
- Once the pH is right, put your soil medium of choice into the net pot. The most common ones are clay pebbles, perlite, and rockwool because of their pH neutrality and absorbent nature.
- Plant your seed in the medium. When it takes to the soil and starts growing, place the mesh pot into your container and make sure the bottom touches the solution. Your role is pretty much over.
- The soil medium will absorb the hydroponic solution, letting your plants grow. As they do, the water level will drop and the roots will continue to follow the solution down. The exposed roots will “breathe” oxygen while the tips suck up the nutrients.
- An optimized location to grow your plant will have a relatively warm climate and either sunlight or UV light. The temperature and light will help protect your plants and solution from bacteria.
- Make sure your container is also out of the way of any potential rainfall because that could easily drown your plant’s roots or throw off the pH. The reason the Kratky Method works is the gap between the roots and the solution, so you don’t want them to suffocate.
- Knowing when to harvest can be tricky with some methods, but Kratky simplifies even that. Most people choose to harvest just before the solution is to the bottom and get perfectly ripe plants.
- The last step is to rinse out your container and start over. If it was in a clean environment, you can get away with a rinse every 3 or 4 plants but either way use diluted bleach on everything and let it dry before going back to step 1.
By using a stagnant hydroponic solution to give the plants what they need while leaving space for the roots to “breathe,” the Kratky Method creates a simple, low-maintenance way to work on your gardening skills.
It’s worth noting that you can accomplish the Kratky Method in something as small as a gallon jug or build a wooden frame for the Method that’s the size of a tabletop. The steps remain the same, though, so it’s just about how many plants you want at a time.
What Are the Pros of the Kratky Method?
There are a number of benefits of the Kratky Method that makes it easy for almost anyone to start with.
A Passive Approach
The hands-off design of the Kratky Method takes away the time-intensive monitoring that other methods require. There’s no need to change out water or worry about oxygen availability, so it will continue to work and your plants will grow with or without you there.
Easy and Affordable
Removing the need for electricity to circulate water with a pump, you can set up your own small garden with mostly household items that can fit practically any budget while creating a source of food or possible income.
Versatility
Due to the nature of the Kratky Method, you can expand your growth with a larger container or go as small as just one plant at a time. It also works great for farmers or gardeners with handicap needs because you can place a container off the ground if need be.
Educational
The Kratky Method is fun and allows you to see the roots in action as well as watch plant growth, so it’s a great way to get kids interested or involved in gardening!
What Are the Cons of the Kratky Method?
Unfortunately, for there to be pros there have to be a few cons and the Kratky Method is no different.
Doesn’t Work For All Plants
While we’ll get into the plants that grow best using the Kratky Method, it’s not for everything. In fact, most large plants or long ones that extend into the container have trouble growing. The same goes for plants with a need for more intensive nutrients, since the method is so passive.
Plant Protection
If your pH is off, it can be hard to adjust it just right so a lot of times it has to be right on the first try. On top of that, the stagnant water can attract bacterial growth as well as algae, mosquitoes, and larvae. Being indoors can avoid some of these, but it’s still a possible problem.
More Growing, More Problems
The Kratky Method can be very tedious with more plants because you have to check the pH of each individual container. The more plants you have, the more you have to do because you’re also limited to the size of your containers. You also might need to add water as they grow.
What Plants Grow Best With the Kratky Method?
The Kratky method may be limited to shorter or smaller plants, but it still lets you grow a number of versatile vegetables, fruits, and herbs. Here are a few that grow best for anyone new to gardening.
Lettuce
Lettuce is one of the easiest plants to start out with because of its fast growth and high yield. It grows best in clay pebbles due to its high absorption and needs a pH around 6.5. You’ll need a balanced nutrient mix with equal parts of everything.
Spinach
It can take up to 9 days for a spinach seedling to develop, but once it does spinach grows fast using the Kratky Method. Needing a pH between 6 and 7 and similar nutrients, one of the best things about spinach is that you can plant it in the same container as lettuce.
You’ll probably harvest the lettuce first, though. Spinach needs a temperature in the high 60’s because low temperatures will cause it to grow at a slower rate.
Strawberries
These are more of an intermediate maintenance because they need daily pollination, but otherwise, strawberries are pretty easy. They take around 2 or 3 weeks for a seedling to grow, but they’re ready for harvest about 2 months after that.
They’re slightly more picky with a pH between 5.5 and no more than 6.2. They also need between 9-12 hours of sunlight, but much like cucumbers, your hydroponic strawberries are crispier.
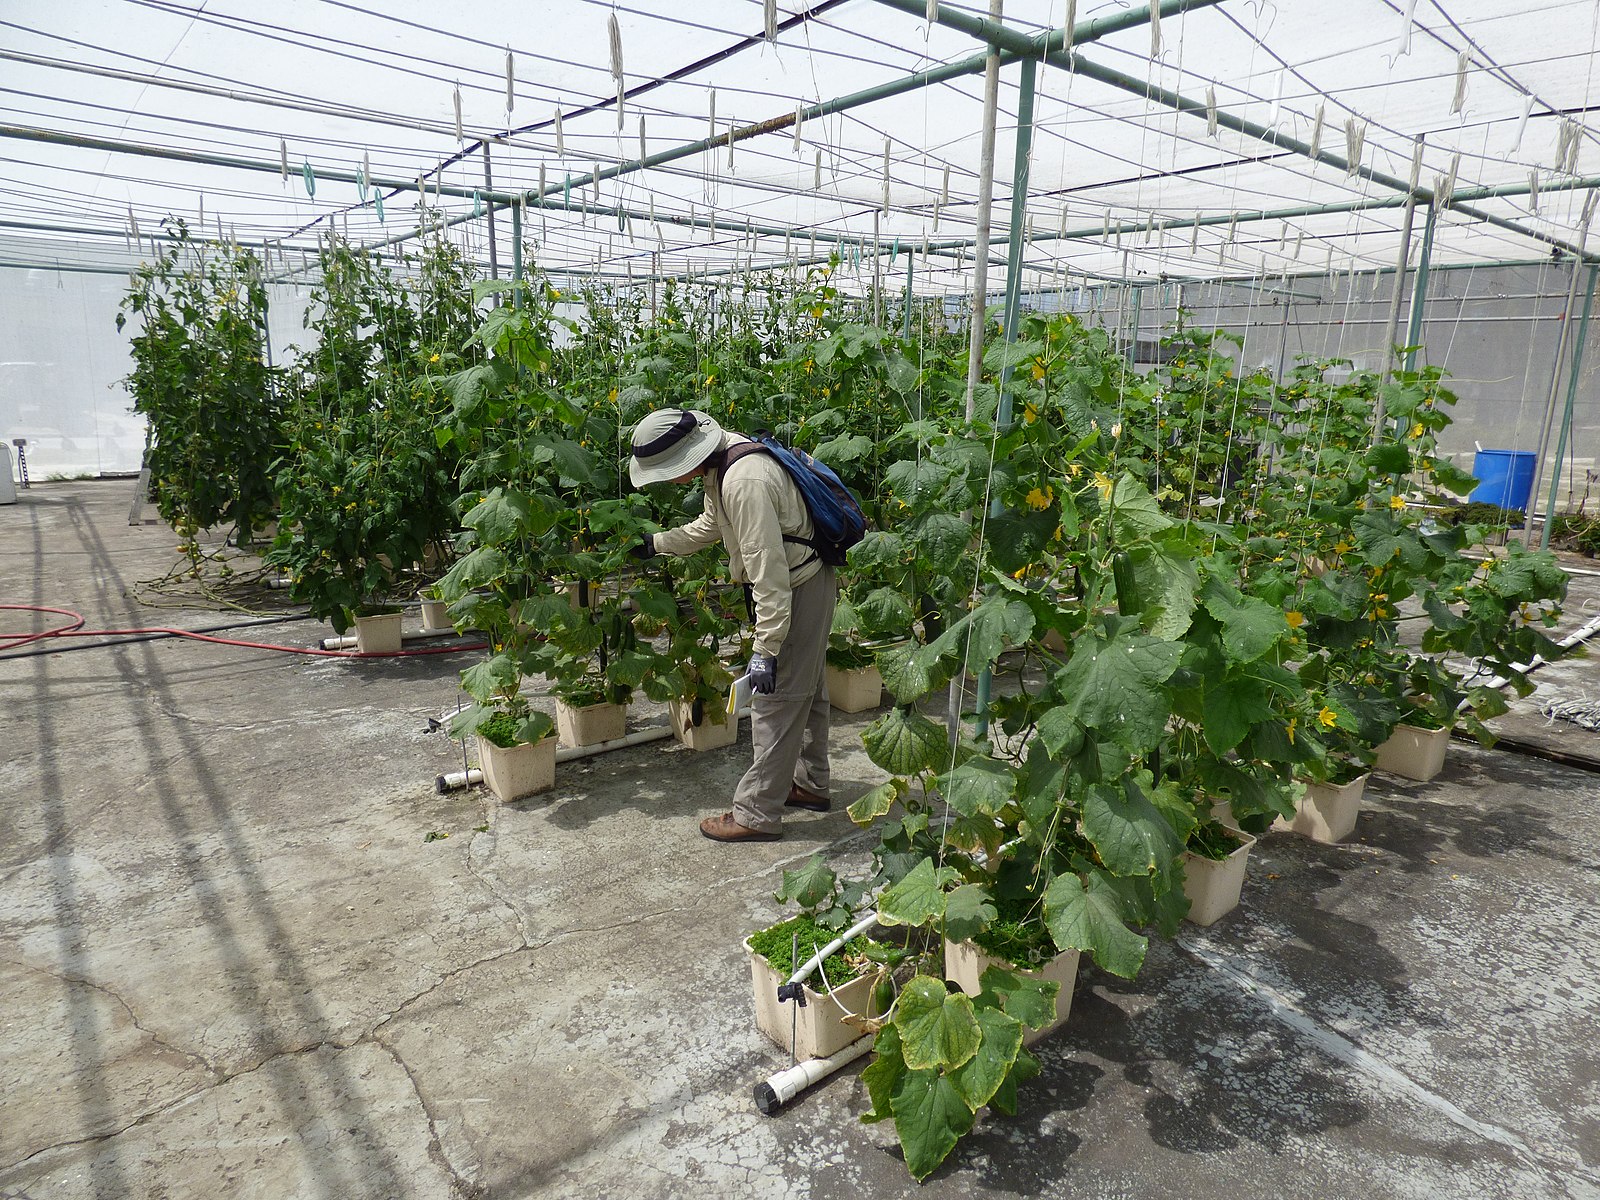
Cucumber
Cucumbers don’t require the extra maintenance of strawberries, but they are the longest plant on this list which means a larger container. You’ll also need the size upgrade because cucumbers will need more water and solution.
The good news is that they’re more flexible with a pH from 5.5-6.5 and a temperature of 64-73 degrees Fahrenheit.
Celery
This is one of the best plants to grow for a beginner looking to dip their toes into the deep end, mostly by teaching patience. That’s because celery usually takes 150 days or 5 months to grow, which can be a long time for a new gardener.
They grow best in clay pebbles and need between 6 and 12 hours of sunlight. Celery needs a temperature of 59-73 degrees, but it’s extremely picky with a pH of exactly 6.5 to properly grow.
Bell Peppers
Bell peppers produce a higher yield, but they’re also one of the thirstiest on here with 3 gallons of water for a single plant! They need a pH as low as 6.5 up to 7.5 with 18-24 hours of sunlight. That might mean having to use a greenhouse-style setup or avoiding bell peppers.
These are definitely not for beginners, because they also need to be pruned from time to time while they grow. As for growing, they aren’t harvestable until about 90 days after the seedling forms.
Tomatoes
While most tomatoes are harder for the Kratky Method, cherry tomatoes are great in the hydroponic system. You’ll need at least a 5-gallon container and 18-22 hours of sunlight, though, so you might have to wait unless you have something for UV.
They’re also thirsty and will require a water refill probably once a week. As for the water, the pH has to be between 5.5 and 6.5 at 60-89 degrees. With pruning, cherry tomatoes take about 4 months to grow so they’re on the higher-difficulty end.
Herbs
Herbs are pretty simple to grow with the Kratky Method, because you can either pluck leaves as they grow or wait to harvest them entirely. The best ones to start with are basil or oregano, but it’s as easy as just researching the requirements of your specific herbs.
Who is the Kratky Method Best For?
Because it’s so easy, beginners are able to follow the detailed steps that keep it simple enough that almost anyone can keep up. As mentioned earlier, the educational value makes it great for kids to learn and gain an interest in hydroponics.
Anyone looking for a supplemental income can find one in a garden that doesn’t require much work. Not only does that mean you can sell your plants to farmers or stores, but it means that it doesn’t take much time for people that don’t have it.
Recap
Knowing what the Kratky Method is and how it works, you can follow the steps and grow plants in anything from a gallon jug to a large wooden frame. Feel free to get rid of any plants that don’t seem to take to the solution, though.
While it’s extremely simple for beginner-level gardeners to try, there are certainly pros and cons to the Method that you might consider if the plant you want to grow isn’t as cohesive with the mesh pot. Either way, good luck with your green thumb!


My husband and I have been growing Kratky style for over 4 years now. We’ve done a lot experimentation with some amazing success and few failures along the way. But with time, patience and some trial and error we’ve got a beutiful Kratky system going. We have had the most success with peas, beans, cabbage, celery, hot peppers, swiss chard, kale, spinach, many different types of lettuce, pickling cucmbers, san marzano tomatoes, cherry tomatoes, strawberries, parsley, chives, basil, oregano & thyme. It has really helped us to have an abundance of fresh veggies on hand all year round. Our two teenage sons know how to set up a kratky bin now too. They both love experimenting with them and my 14 year old even figured out how to grow potatoes with the Kratky method! We love it for it’s off grid potential and easy set up and maintenance. Everyone should know this simple hydroponics method.